Intelligent Anesthesia Scheduling
A Recipe for Selenium Testing a Django Project Using PostgreSQL in Bitbucket Pipelines
Time Commitment: This recipe should take about 20 minutes to run through if you have an existing Bitbucket account and have Git, Python, and Firefox already installed.
Below is a recipe for building a basic Django Project that can be tested with Selenium in a BitBucket pipeline.
We create a bare project that includes just the admin urls and app to keep this as barebones as possible.
Once the scaffolding for testing is working locally and in the bitbucket pipeline, starting and testing a new app with custom models, urls, and views will be straightforward.
Written by Wesley Emeneker 2022-12-17. Email dev@physs.co.
Things you need to follow this recipe closely
- A recent python installed (3.6 or later) with the
venvmodule available. See References for the Python 3.11 I used. - Git
- Firefox web browser. (Chrome and Edge are options, but the test in the recipe hard-codes Firefox)
- A Bitbucket account with Pipeline execution turned on (free accounts get 50 free minutes per month as of 2022-12-17)
- A terminal in Linux or Mac OS, or PowerShell in Windows
- When you encounter things like this: <PASSWORD>, use a unique string that only you know
This recipe has 3 major gates. Each gate must be completed in order.
- Make a BitBucket repository with a Django project that runs on your local computer
- Make and run a Selenium test against the project
- Create and run a pipeline config in Bitbucket with PostgreSQL
Gate 1: Make a Bitbucket repository with a running Django project
Make a BitBucket Git Repository for the project
On the bitbucket dashboard, make a newselenium_test.
Clone the empty repository
After creating the empty repository in Bitbucket, clone the repository with SSH (HTTPS possible but not recommended).cd ~ # Use your home directory as the starting point
git clone git@bitbucket.org:<YOUR_PROJECT>/selenium_test.gitcd # Use your home directory as the starting point
git clone git@bitbucket.org:<YOUR_PROJECT>/selenium_test.gitNotes
If you clone with HTTPS instead of SSH, you may have to setup an App password to clone the repository
Create the environment for the repository
py -m venv selenium_test_env
selenium_test_env/Scripts/activate
pip install django pytest pytest-django selenium
python3 -m venv ~/selenium_test_env
source ~/selenium_test_env/bin/activate
pip3 install django pytest pytest-django selenium
Notes
This recipe uses python with venv and pip because it is the lowest common denominator. Conda, poetry, pipenv, virtualenv, etc. will all work well if you prefer them.
Create the project and superuser
Use django_admin for the username of the superuser. Choose a good password and save it. We need it later when adding the DJANGO_ADMIN_PASSWORD variable to BitBucket.
django-admin startproject selenium_project selenium_test
cd selenium_test
.\manage.py makemigrations
.\manage.py migrate
.\manage.py createsuperuser --username django_admindjango-admin startproject selenium_project ~/selenium_test
cd ~/selenium_test
./manage.py makemigrations
./manage.py migrate
./manage.py createsuperuser --username django_adminDiscussion
Later in the recipe, the password will be stored in an environment variable and we will store it as a secure variable in BitBucket.
Test that you can login to the app
.\manage.py runserver./manage.py runserver- Open a browser and visit
http://127.0.0.1:8000/admin - Login with the
django_adminaccount created earlier - Stop the
runserver. For Linux/Mac, press Ctrl+c. For Windows, either Ctrl+c or Ctrl+BREAK
Gate 2: Successfully make and run Selenium tests against the project
Create the data fixtures needed by Django tests
cd ~
cd selenium_test
New-Item -Path .\tests\tests_selenium\fixtures -Type Directory
.\manage.py dumpdata auth.User -o .\tests\tests_selenium\fixtures\users.jsoncd ~
cd selenium_test
mkdir -p tests/tests_selenium/fixtures
./manage.py dumpdata auth.User -o tests/tests_selenium/fixtures/users.jsonDiscussion
Storing the user model data in a file of JSON makes it easy to pre-load data for the database we will use for local Selenium tests. Storing the data this way is not a security risk. The passwords are not plaintext. That said, the password used for the django_admin account should not be reused anywhere else, and it definitely shouldn't be your production password.
Make the test
Put the following code intotests/tests_selenium/test_selenium_testapp_login.py
import os
from pathlib import Path

from django.test.selenium import SeleniumTestCase
from django.contrib.staticfiles.testing import StaticLiveServerTestCase
from selenium.webdriver.common.by import By

fixtures_directory = Path(__file__).parent / "fixtures"

"""
We MUST use a live server AND a transactional database for 2 reasons
1. If live_server is missing, the selenium webdriver won't be able to
     actually receive any rendered page
2. If transactional_db is missing, all the app data will be kept in
     memory in the test runner process, so the selenium process won't
     be able to access any of the data.
   We must have a live database for this to work.
"""

class SeleniumTest(SeleniumTestCase, StaticLiveServerTestCase):
    databases = {"default"}
    fixtures = [
	fixtures_directory / "users.json",
    ]
    # browser and implicit_wait are needed by the SeleniumTestCase class
    # You can use 'chrome' or 'edge' here if you don't want to install firefox.
    browser = 'firefox'
    # Increasing the implicit_wait from the default of 3 makes the pipeline reliable
    implicit_wait = 10
    # The SELENIUM_HOST variable may be defined by our bitbucket
    #   repository settings for using the selenium docker image.
    selenium_hub = None if not os.environ.get(
      "SELENIUM_HOST", None
    ) else f'http://{os.environ["SELENIUM_HOST"]}:{os.environ.get("SELENIUM_PORT", 4444)}'
    external_host = os.environ.get("SELENIUM_HOST", None)

    def tearDown(self):
        self.selenium.close()

    def test_login(self):
        login_button_xpath='//input[@value="Log in"]'
        self.selenium.get(f"{self.live_server_url}/admin")
        username_input = self.selenium.find_element(By.NAME, "username")
        username_input.send_keys('django_admin')
        password_input = self.selenium.find_element(By.NAME, "password")
        password_input.send_keys(os.environ["DJANGO_ADMIN_PASSWORD"])
        self.selenium.find_element(By.XPATH, login_button_xpath).click()
Successfully run the test from the selenium_test top-level directory
cd $HOME\selenium_test
$env:DJANGO_SETTINGS_MODULE='selenium_project.settings'
$env:DJANGO_ADMIN_PASSWORD='<THE PASSWORD>'
pytest
cd ~/selenium_test
export DJANGO_SETTINGS_MODULE="selenium_project.settings"
export DJANGO_ADMIN_PASSWORD="<THE PASSWORD>"
pytest
Notes
The first time this is run, the browser may take a long time to start (20-30 seconds).
Add, commit, and push
git add manage.py
git add selenium_project/wsgi.py selenium_project/urls.py \
    selenium_project/asgi.py selenium_project/__init__.py
git add tests/tests_selenium/fixtures/users.json \
    tests/tests_selenium/test_selenium_testapp_login.py
git commit -m "Ran the first successful Selenium test of selenium_testapp with Firefox"
git push
Discussion
At this point, the directory structure of the Django project should look like this:
~/selenium_test
├── db.sqlite3  # './manage migrate' created this sqlite3 db
├── geckodriver.log  # This log file was created by selenium
├── manage.py
├── selenium_project
│   ├── asgi.py
│   ├── __init__.py
│   ├── settings.py
│   ├── urls.py
│   └── wsgi.py
└── tests
    └── tests_selenium
	├── fixtures
	│   └── users.json
	└── test_selenium_testapp_login.py
Gate 3: Setting up a pipeline config to run in Bitbucket with PostgreSQL
All of the above steps must be successfully completed before moving on.
Make a settings.py for Bitbucket
Copy-Item .\selenium_project\settings.py .\selenium_project\settings.bitbucket-pipelines.pycp selenium_project/settings.py selenium_project/settings.bitbucket-pipelines.pyselenium_project/settings.bitbucket-pipelines.py so that the database will use postgres and the username and password will match. The DATABASES variable in selenium_project/settings.bitbucket-pipelines.py should be identical to this:
DATABASES = {
    'default': {
	'ENGINE': 'django.db.backends.postgresql',
	'NAME': 'django',
	"USER": 'django',
	"PASSWORD": '<RECIPE_PASSWORD2>',
	'HOST': '127.0.0.1',
	"TEST": {
	    "NAME": 'django_test',
	}
    }
}
Discussion
The original settings.py uses a SQLite database definition that doesn't require a username and password. SQLite is a great choice for starting development. This recipe uses PostgreSQL in the pipeline because Bitbucket makes it easy to add and use services from docker images. This way, we get quick local development and quick pipeline work.
Make a bitbucket-pipelines.yml
Put the following code into bitbucket-pipelines.yml.
Make certain that the POSTGRES DB, USER, and PASSWORD variables match the NAME, USER, and PASSWORD from selenium_project/settings.bitbucket-pipelines.py.
pipelines:
  default:
    - step:
        name: "Python 3.10 tests"
        image: python:3.10
        services:
          - postgresql14
          - selenium-firefox
        script:
          - pip install django pytest pytest-django selenium psycopg2
          - cp selenium_project/settings.bitbucket-pipelines.py selenium_project/settings.py
          - DJANGO_SETTINGS_MODULE="selenium_project.settings" pytest

definitions:
  services:
    postgresql14:
      image: postgres:14
      variables:
        POSTGRES_DB: 'django'
        POSTGRES_USER: 'django'
        POSTGRES_PASSWORD: '<RECIPE_PASSWORD2>'
        POSTGRES_DB_TEST: 'django_test'
    selenium-firefox:
      image: selenium/standalone-firefox:latest
      ports:
        - "4444:4444"
Add those files and push the changes to Bitbucket
cd
cd selenium_test
git add bitbucket-pipelines.yml selenium_project/settings.bitbucket-pipelines.py
git commit -m "Added bitbucket pipeline definition and Django project settings to match the pipeline configuration"
git push
The repository should now have these files:
~/selenium_test
├── bitbucket-pipelines.yml
├── db.sqlite3
├── geckodriver.log
├── manage.py
├── selenium_project
│   ├── asgi.py
│   ├── __init__.py
│   ├── settings.bitbucket-pipelines.py
│   ├── settings.py  # This file should NOT be in the git repository
│   ├── urls.py
│   └── wsgi.py
└── tests
    └── tests_selenium
	├── fixtures
	│   └── users.json
	└── test_selenium_testapp_login.py
Enable Pipelines for the Bitbucket Repository
selenium_test repository,
- click
Repository settingsat the bottom of the left navigation bar, - then click
Settingsin the Pipelines section near the bottom of the left navigation bar - then click
Enable Pipelines
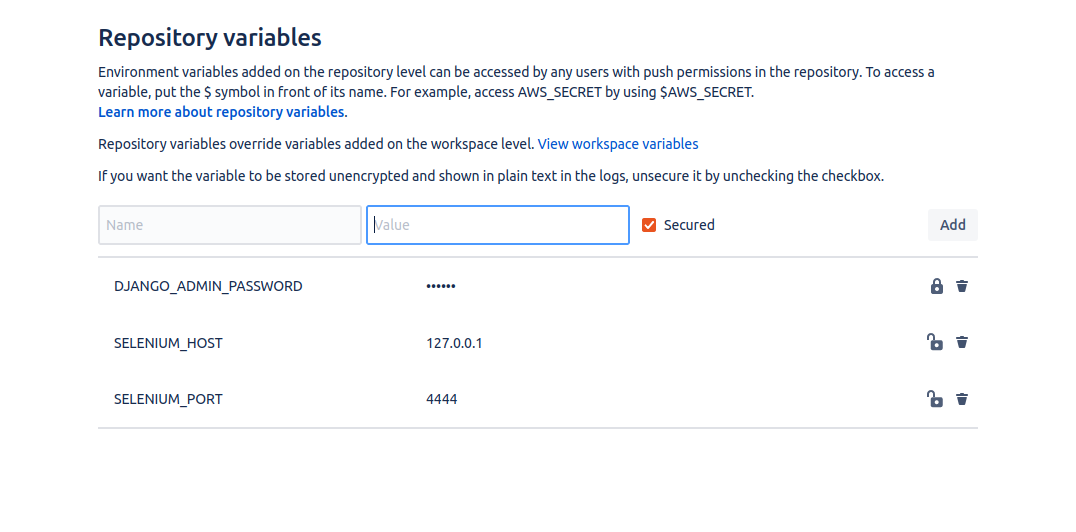
Set the repository variables needed for the Selenium tests
- In the Bitbucket repository, click
Repository settings. - Under the "Pipelines" section, click
Repository variables. - Add name "SELENIUM_HOST" value "127.0.0.1" uncheck the "secured" checkbox.
- Add name "SELENIUM_PORT" value "4444" uncheck the "secured" checkbox.
- Add name "DJANGO_ADMIN_PASSWORD" with the value of the
django_adminsuperuser password chosen in Gate 1;check the "secured" checkbok
selenium.common.exceptions.SessionNotCreatedException: Message: Expected browser binary location, but unable to find binary in default location, no 'moz:firefoxOptions.binary' capability provided ...
Run the first pipeline
Return to the repository by clicking on the repository nameselenium_test at the top of the left navigation bar. Then click Pipelines in the left navigation bar and finally click Run initial pipeline.
Start from the master branch.
Run the default pipeline.
Wait for build success
If this recipe was correctly followed, you are now able to run Selenium tests with Firefox on your local development machine and within Bitbucket pipelines.Next Steps: Left for the reader
- If you don't have firefox installed or don't want to have it, use chrome or edge. This will required changing the
browservariable in the unit test, and will require modifications to thebitbucket-pipelines.ymlfile to use a Chrome or Edge service - Add an app, models, and urls and selenium tests starting from the unit testing template in
test_selenium_testapp_login.py
Notes
This was tested on Ubuntu 22.04, Windows 10, and Mac OS 12.6 (Monterey).References
- Bitbucket
- Selenium
- Python 3.11 for Windows
- Python 3.11 for MacOS
- Clone a Bitbucket Repository
- Ubuntu 22.04 python:
sudo apt install python3 python3-venv